
chemical etching process
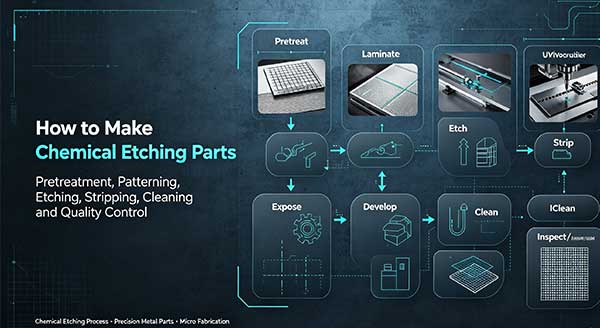
Chemical etching, also known as photochemical machining, is a subtractive manufacturing method that uses corrosive chemicals to accurately remove material from thin metal sheets to create complex, burr-free precision components. It is widely used to produce filter meshes, encoder discs, metal shims, bipolar plates and other thin metal parts.
Step 1: Material Selection & Preparation
Start by selecting suitable raw metal sheets. Common materials include stainless steel, copper, brass, nickel, titanium and alloy foils. The sheet thickness typically ranges from 0.01mm to 1.5mm. Clean the metal surface thoroughly to eliminate grease, oil, oxidation and contaminants. A clean surface ensures the photoresist adheres evenly and prevents pattern defects.
Step 2: Apply Photoresist Coating
A light-sensitive photoresist film is laminated or coated onto both sides of the cleaned metal sheet. The coating must be uniform to guarantee consistent pattern transfer. The coated metal will be dried to stabilize the photoresist layer.
Step 3: UV Exposure with Artwork Tooling
A custom-designed film mask (phototool) with your part geometry is placed tightly on top of the photoresist. UV light passes through the transparent areas of the mask and cures the exposed photoresist. The masked regions remain unhardened. This step transfers your CAD drawing pattern onto the metal surface.
Step 4: Developing
The sheet goes through a developer solution to wash away the unexposed, soft photoresist. After developing, only the UV-cured photoresist remains on the metal, forming a protective mask matching your component outline. The bare metal areas are ready for etching.
Step 5: Chemical Etching
The sheet is sprayed with heated etchant solution on both sides. The etchant dissolves the exposed bare metal selectively. The protected areas covered by cured photoresist stay intact. Etch time is precisely controlled to achieve the required depth and dimensional tolerance. This process etches evenly without mechanical contact, leaving no burrs or material stress.
Step 6: Stripping Photoresist
Once etching reaches the target depth, the residual cured photoresist is stripped off using stripping chemicals. The metal part pattern is fully revealed.
Step 7: Post-Treatment & Finishing
Optional secondary treatments can be added: deburring, polishing, passivation, plating, anti-corrosion coating or surface finishing according to requirements.
Step 8: Inspection & Quality Control
Finished parts are inspected for dimension, aperture tolerance, flatness and surface quality. Qualified components are cleaned, sorted and packaged for shipment.
Core Advantages of Chemical Etching
- No mechanical contact, no burrs and no material deformation
- Fabricates ultra-thin metal foils and complex micro geometries
- Low cost for custom prototypes and mass production
- Fast lead time, no expensive hard tooling
- Consistent dimensional accuracy across batches
Typical Applications
Precision filter mesh, optical encoder discs, thin metal shims, fuel cell bipolar plates, electrical contacts, EMI shielding parts and automotive fluid filter components.