
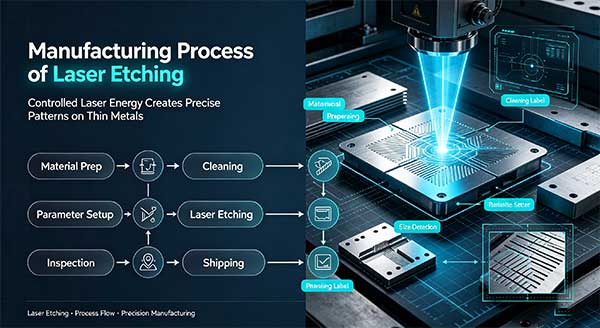
laser etching steps
Laser etching is a non-contact subtractive manufacturing technology that uses focused high-energy laser beams to permanently mark or remove material from workpiece surfaces. It is widely used for part marking, surface texturing, and manufacturing precision thin metal components.
Step 1: Material Selection & Surface Preparation
Select raw materials according to product requirements. Common substrates include stainless steel, aluminum, copper, brass, nickel alloy and some plastics. Clean the workpiece surface to remove oil, dust, oxide layers and fingerprints. Contaminants will affect etching uniformity and cause inconsistent marking depth. Flatness check is also required, especially for thin metal sheets.
Step 2: Design File Preparation
Convert CAD drawings, logos, text or patterns into laser machine-compatible vector files. Adjust parameters such as line width, etching depth and resolution in software. Set laser path, scanning speed and power preset based on material thickness and target effect. Fine-tune to avoid over-burning or insufficient depth, especially for ultra-thin foils.
Step 3: Workpiece Fixturing & Positioning
Fix the sheet or part on the worktable with fixtures. Ensure stable clamping to prevent shifting during laser scanning. Calibrate laser focus and align the origin position. High-precision jobs often use vision alignment systems to guarantee repeatability for batch production.
Step 4: Laser Etching (Material Ablation)
The focused laser beam hits the material surface locally. Heat from the laser either melts, vaporizes or modifies the surface layer.
- Surface marking: Only changes surface texture or color without deep material removal.
- Deep etching: Controlled ablation to achieve defined depth for functional patterns, slots or micro features. No physical cutting tool touches the part, so no mechanical stress is introduced.
Step 5: Debris & Residue Cleaning
Remove laser slag, oxide residues and fume deposits left after laser processing. Methods include air blowing, ultrasonic cleaning or gentle wiping. Residues must be fully cleared, otherwise they may cause corrosion or affect dimensional accuracy of precision parts.
Step 6: Post-Processing (Optional)
Optional surface treatments depend on application needs:
- Passivation or anti-rust coating for stainless steel
- Anodizing for aluminum
- Surface polishing to reduce roughness
- Masking for selective area protection
Step 7: Dimensional & Visual Inspection
Inspect critical dimensions, pattern accuracy, depth consistency and surface quality. Check for defects such as burn marks, incomplete etching or position deviation. For mass production, sampling inspection is adopted. High-precision products use microscope or coordinate measuring instruments for verification.
Step 8: Packaging & Delivery
Qualified parts are cleaned again, packed separately to avoid scratching. Anti-rust paper or vacuum packaging is used for metal components before shipment.
Key Notes in Laser Etching Process
- Heat affected zone (HAZ) is inevitable. For ultra-thin metal foils, low power and high scanning speed are required to prevent deformation.
- Etching depth is limited compared with chemical etching. Deep micro patterns are usually more costly and slower.
- Vector graphic quality directly decides edge sharpness.
- Different metals require different laser parameter recipes.
Typical Applications
Part serial numbers, QR codes, brand logos, scale lines, micro patterns, encoder disc marks, precision shim marking, filter mesh identification.