photochemical machining model parts
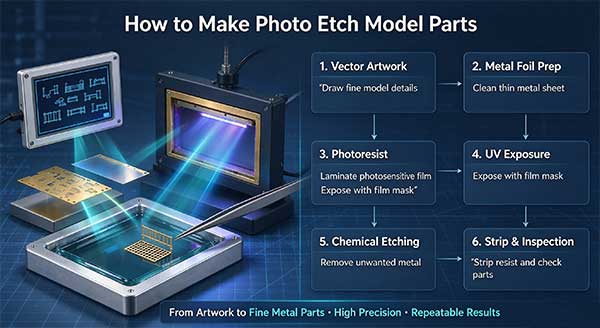
Photo etched model parts are ultra-fine thin metal accessories for scale models, manufactured via photochemical machining, also known as photo etching. This process creates intricate tiny features that stamping and laser cutting struggle to produce. Below shows the complete process of how to make photo etch model parts.
- Design and artwork creation Design 2D CAD drawings of model components, such as railings, rivet sheets, grilles, brackets and decorative trim. Convert CAD files into high-resolution black-and-white film artwork. All micro gaps and thin lines must be precisely defined to avoid fragile or broken features.
- Thin metal material preparation Select proper thin metal foils. Brass, copper and stainless steel are the most common materials for photoetch model kits, with typical thickness from 0.02 mm to 0.5 mm. Clean the metal surface completely to eliminate grease, oxidation and dust for stable photoresist adhesion.
- Dry film photoresist lamination Lay dry film photoresist onto the cleaned metal sheet. The photoresist layer is UV-sensitive and acts as a protective mask during later etching. Ensure no bubbles or impurities between film and metal.
- UV exposure Align the prepared artwork film on the photoresist-covered metal foil. Expose the sheet under UV light. UV radiation cures and hardens the photoresist in transparent areas of the film, while parts covered by black patterns remain unhardened.
- Developing Apply developer solution to wash away unexposed, soft photoresist. This step exposes bare metal areas that will be etched away, while hardened photoresist protects the shape of model parts.
- Chemical etching Immerse the sheet in etching solution. The uncovered metal is dissolved by chemical reaction. Controlled temperature, spray pressure and etching time deliver clean edges and consistent depth without burrs.
- Photoresist stripping Use stripping solution to remove the cured photoresist mask. After stripping, the detailed metal model parts are fully revealed on the sheet frame.
- Inspection and post-processing Carry out dimensional inspection and visual check to verify tolerance and edge quality. Parts go through cleaning and surface treatment. Finally, finished components can be separated from the carrier frame for model assembly.
Important notes when making photo etch model parts
- Match minimum line width to metal thickness to prevent tiny structures breaking.
- Surface contamination will cause open or missing patterns.
- The photo etching process supports small batch custom orders and mass production for model manufacturers.
- The finished photoetched parts can be polished or surface finished according to model design requirements.
Photo etched metal parts greatly upgrade the realism of ship, aircraft, tank, train and architectural scale models, which is why this technology is popular among model makers worldwide.